How to source raw materials and develop high performing earth building mixes
How to source raw materials and develop high performing earth building mixes
Jul 01, 2023
Are you are thinking of building with earth but wonder where to start? Where to find the materials? What to look for and how to know if these materials are suitable for the earth building application of choice (earthen plasters and floors, cob, adobe brick, rammed earth, light earth infill, etc)?
To answer this, we need to start with a little bit of soil science and then look at some simple soil tests, before covering the process of developing “recipes”.
One of the characteristics of earth building is that there is no such thing as a fixed recipe because soils vary greatly from place to place. So that's a challenge, but it's also what makes earth building really exciting. We think there's a lot of scope in demystifying this a little bit, because once you get the fundamentals of it, and once you really get into the mindset of testing and being curious about what happens when you use soils, by knowing these basics you'll be able to develop your own recipes quite easily.
Sourcing Sub-soil for building purposes
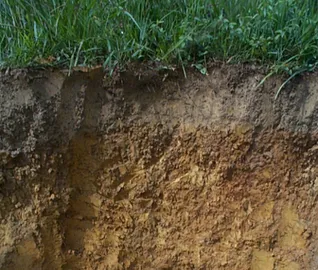
For building purposes, we're talking about subsoils. Here you see a section through a soil profile: you have the vegetation at the top, then you have the layer of topsoil (that stuff that grows plants) and below that there is the subsoil. And this is the layer we are talking about when we're talking about sourcing materials for earth building. You want to be sure that the topsoil is removed, and you get to that subsoil layer. In different places that is a different depth. So, in some places you will only have a couple of centimetres of topsoil and other places there's meters of it.
A really good starting point when you are looking for subsoils in your local area, is to start noticing cut or eroded banks (near roads, rivers or the coast), or if there is a building site and there's cut soil you can see what layers are present.
Constituents of Subsoil
When we are looking at subsoil, we always encounter a mix of particles that stem from geological erosion processes that happen through heat, wind, freezing, movement of ice and water, etc. And the tendency is for particles to become smaller and smaller. Every soil sample is made up of these different particle sizes, and their ratios will give the soil its characteristics.
Different particle sizes have different names: you might find stones, gravels, sands, and very, very fine silt. And then there's a constituent that is even finer than the silt and that often looks and feels very similar: the clay.
The clay is really the magical ingredient in the subsoil. It’s what sticks everything together (we also refer to this as a binder).The clay can also be the problematic ingredient because it tends to swell and shrink when it gets wet and when it dries out again. We really need to understand how the clay behaves, because it influences a how strong the whole mix is for building and also how much it will shrink.
Even within the same batch of subsoil, you will have a variation of percentages of clay. Subsoils will lean towards certain characteristics locally, but the exact percentage of clay is not actually that important. What is important is to understand whether a soil is high in clay or low in clay. And it is also important to understand if you're actually looking at clay, or if you're looking at silt, because silt often feels a little bit sticky. It could be mistaken for clay, but it is quite dusty and not very strong. So, you want to be sure that there's not too much silt in the mix.
You don't need to take your soil sample to a lab to get this tested because a lab would give you a very accurate reading, but it would only tell you something about your exact sample and it might be a different for another local soil sample. There are a couple of tests that you can do in the field to give you confidence that you understand what kind of soils you are dealing and then you can take it from there.
The first invitation is to engage your senses. It is very useful to start touching the material and to mix it with water, because that will teach you a lot. Start by feeling whether it's sticky, gritty or slimy. And I suggest you do this really simple hand test, which is called a disc test.
Disk Test
For the disk test it is really important that you start by properly hydrating and kneading your soil sample, to fully activate the cohesion (stickiness) of the clay in the sample. Failing to do so will result in a weaker test specimen and distort your results (see section below).

We suggest the following steps when doing soil samples:
- Put the subsoil in a container and add some water (not quite covered, you don’t want the mix to be soggy)
- Let the water soak in for a couple of hours or over night (you can cover the sample with a plastic bag or a lid so the water doesn’t evaporate)
- Just by hydrating the soil sample might become sticky, but it is important it gets worked well by kneading, to break up any clay lumps and to get a homogenous mix (take out any small gravel)
- Cast the disk (wet the disc mold first for easier release)
- Let disk air dry or dry in oven at low temperature
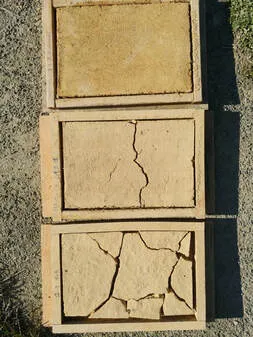
Once it’s dry you can read a couple of things from it:
You can see how much it shrinks which will tell you if there is a lot or little clay in the sample; you can try and break it and see if it's strong (it is useful to compare samples for this); and you can rub it and see if it is dusty, which indicates sandy or silty mixes. These three things are really useful piece pieces of information and the reason why the disk test is our preferred test.
We suggest that you get different subsoil samples, maybe at different depths, and start making these test disc to see how they perform. The ribbon test is another useful simple soil analysis test. However, we do not recommend the jar test, even though it routinely gets cited in the literature. It has been proven to be up to 1800% out.
Cohesion of soil
Cohesion is the stickiness of the clay and what makes it a binder. When we're adding water to a dry subsoil sample, the water goes into the soil and activates the clay, making it sticky, and giving you the ability to form things with the soil. When it dries out again, the water leaves the sample or the building material, and it keeps it shape and goes hard and strong. This is really what earth building is about in its purest form. In our work we're not relying on other types of binders, such as lime or cement mixed in with the earth. We work with pure earth and are only using the clay as a binder, so we're working with this cohesion a lot.
Cohesion gets activated by motion and kneading. The clay particles have a plate structure, and by kneading water is forced between the platelets, which in turn leads to a molecular electrical charge between the clay and the water: this charge is what makes damp/wet clay sticky. By soaking overnight, we let the clay absorb water, and then we're also actively working the clay to activate cohesion. If there's not enough motion, we're missing out on activating cohesion fully. This really affects the quality and strength of mixes and earth building materials.
If you're using machinery for mixing, you need a machine that forces the mix: For example a paddle mixer, or a rotary hore or something like that. Or if you are mixing with human power, it is good to spend enough time stomping, folding over, and stomping again.
Once we have a feel about whether you are dealing with a clayey, sandy or silty soil, what do we do with this information? We start developing “recipes” with the desired outcome in mind.
Depending on the soil and other materials available locally, and depending on the earth building technique of choice, the “recipes” will vary.
Only in rare occurrences will the subsoil be used exactly how it comes out of the ground. Mostly for building, other raw materials, like mineral aggregates or fibers, will be added to it, to create a material that is really high performing.
Depending on the application, by high performing we mean:
- There's not too much shrinkage in the mix, so you don't end up with cracks.
- It is stable and it doesn't dust too much.
- It is strong (hardness, adequate compressive or tensile strength)
- It is durable (resistant to water erosion)
So, depending on what a mix is used for, be this building a mud brick home, or installing an earthen plaster or floor, of making a pizza oven, those requirements will vary. The idea is to go into sampling knowing what the end product will be.
Sourcing natural building materials locally
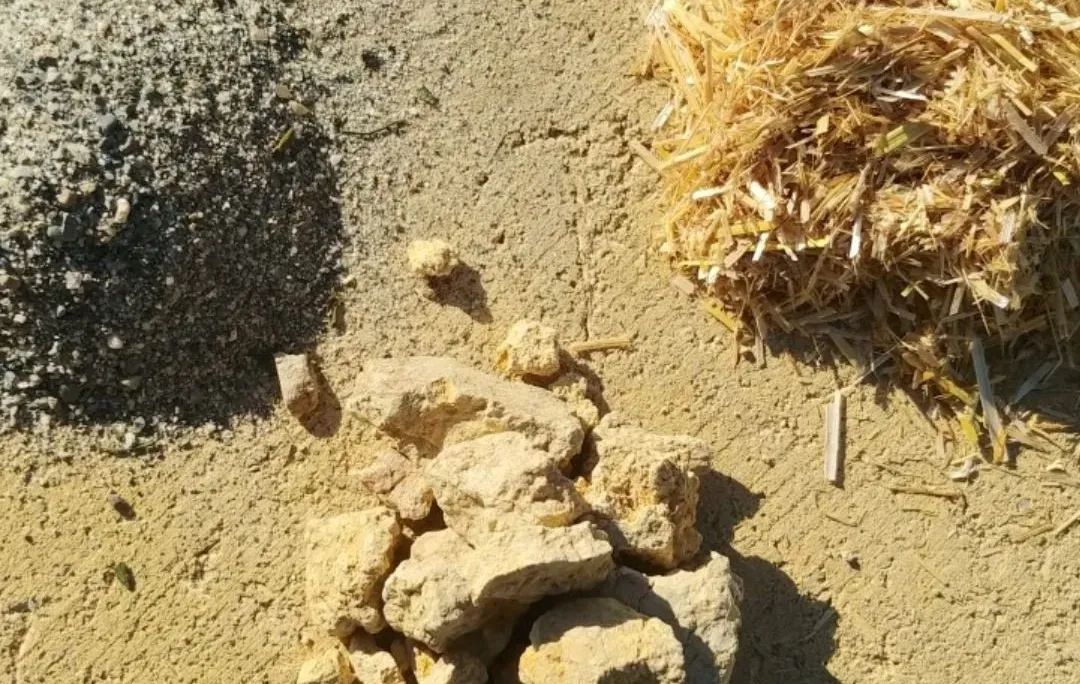
The materials that can be added to earthen mixes are roughly divided into two groups: mineral aggregates, and bio-materials (fibers). The beauty of earth building is that often really local base material can be used, and we encourage you to also source other additives as locally as possible. While well graded, sharp sand and straw are the classical additions, there are many other granular or fibrous materials that can be mixed with earth. Some fibers might not be grown in your bio region, and in some places, sand is a resource that is becoming more scarce or is mined in dubious ways, or it is not well graded. Transport will add cost and embodied energy.
Aggregates and Fibers
The invitation is to start investigating what kind of aggregates and fibers are available locally, and start doing test samples with a range of materials and ratios.
Some materials that could be interesting to check out:
- Sands and crusher dust
- Pumice
- Wood shavings, sawdust, wood chip
- Cellulose (wood pulp or recycled paper pulp)
- Hemp shiv
- Straw, flax, pampas (not pea straw)
- Rice husk, corn husks
Not every biomaterial is useful. For example, things that decay very fast, like pea straw or bark, are not ideal. Also, some biomaterials and aggregates don't have the right shape or aren’t well graded. If they're too coarse, or they don't hold water well, they might not work. For all the aggregates and fibers, the particle size and the particle shape does matter. A sawdust might not perform as well as wood shavings for example.
So, it is important to experiment with local materials, especially if you get a bit experimental. Make test samples with different ratios and ingredients and see how they perform.
Developing earth building “recipes”
When developing “recipes”, we start with the end in mind. If we’re doing a plaster, we start by mixing different ratios and testing plaster samples. If we’re after bricks, we make test bricks. It is important to make the test samples in the thickness that represents the finished product. So for plasters, we would be looking at maybe 10mm, but for bricks 130-150mm.
We want to methodically adjusting recipes until we find the sweet spot, and ideally document the process well so that it can be reproduced. Again, we are observing cracking patterns, dusting, weakness, and so forth. Adding sand to a mix will reduce cracking but might lead to a weak mix. Combining fibers and mineral aggregates might be more useful. Using lots of fibers results in lighter mixes with better insulation values, and so forth.
Once a satisfactory test sample has been achieved and the “recipe” is determined, the next step is scaling. Making bigger amounts of mix comes with its own challenges. It’s not a big effort to put some decent amount of work into activating cohesion in a sample, but when we are scaling, the mixing actually becomes a big part of the whole overall job. It is important to have a strategy in place to streamline that. And for smaller projects that could be having a few people to help stomping, or you could use a handheld rotary hoe or a paddle mixer, or if you're going to a bigger operation, I would suggest utilizing machinery, such as a tiller on the back of a tractor, a digger, etc.
Testing Natural Building Materials
The final step, especially when developing earthen mixes for whole walls (load-bearing walls or infills) is to do some proper strength and durability tests that can be used in your building documentation.
Earth Building Standards
This is where the New Zealand Earth Building Standards come in. It is very good set of standards applicable – and in high regard – worldwide. They were first written in 1998 and have recently been revised and extended.
For material testing, you would be looking at NZS4298:2020. It is aimed at supporting owner builders and producers of earth building materials alike. The tests are simple and user. Some of them can be done in the field or they require a very simple testing set up. Table 2.1 lays out which tests are advisable for the different earth building techniques and each test is described in detail.
The older version of the standard can be downloaded for free, but buying the new version is in direct support of promoting natural building and sending according political signals.
All the steps described could of course be discussed in much more depth. This is what we do during our 3-month online Earthbuilding Academy, where we spend two weeks covering sampling in theory and practice and support all our students to directly work with their local materials. It is wonderful to come into contact with the diversity of options, and it feels like ongoing learning for everyone involved. We also cover the NZ Earth Building Standards extensively, adapting to situations in other countries if required.
If you would like to watch the extended version presenting this material, including a demonstration of the disk test, you can do so here.